Pages

Showing posts with label recipe. Show all posts

Wednesday, 10 October 2012

Cravin' : Corn Dogs!

One of the perks of having lived on different continents and travelled to many countries is tall the tasty
morsels I've managed to eat!

Things such as :
- homemade empanadas from a little boy who would come by the dive shops with a massive pot of them when I lived in Roatan..
- curry udon in Japan..
- tasty tagines in Morocco..
- delicious roadside schwarmas in Oman..
- corn dogs at Capital Ex in Edmonton...
@Capital Ex, Edmonton '08
I love Fair food! Well, I love Fairs in general!!
The downside is, once I'm away from these delightful places with their decadent delights, it can be hard to come across these taste morsels again!!

A few weeks ago, I had a hankering for corn dogs.. but as hot dogs (the kind on a stick) are pretty hard to come by in the UK.. I knew I'd have to make my own corn dogs if I really wanted to eat'em... so I turned to the trusty interwebs and let my fingers do the walking...

I found this recipe and was super stoked when I realised I actually had all the ingredients necessary.. apart from the hot dogs and skewers.. oh and milk.. (we usually have rice milk as regular milk doesn't always get along with my stomach...) I text the mister to find some hot dogs on the way home (and milk) and he did not disappoint!

These were seriously so easy to make, the hot dogs took less time than the curly fries I threw in the oven to go with them! If only hot dogs weren't so hideously bad, I'd probably make these all the time... oh... and the deep frying.. that bit's not really good for you either... damn...

what I used : (for 6 hot dogs)
1/2 c cornmeal
1/2 c plain flour
1/8 t salt
couple of twists with the pepper grinder
1/8 c golden granulated sugar
2 t baking powder
1 egg
1/2 c milk

vege oil for frying
6 hot dogs/frankfurters
corn flour for dusting

what I did :
1. Dry hot dogs and roll in a thin layer of cornflour in a shallow dish.
2. Combine dry ingredients.
3. Stir in egg and milk.
4. Preheat oil in a deep saucepan over medium heat.
5. Roll franks in batter until well coated.
6. Fry 1 or 2 corn dogs at a time until lightly browned, around 3 minutes.
7. Drain on paper towels.
8. Enjoy!!

I had some batter leftover, so I diced up some onion, dropped it into the batter then dropped spoonfuls of the onion batter into the hot oil and made myself some hush puppies!! I didn't get any photos of the hush puppies... but they were deeeelish!!

They were so super simple and were pretty darned tasty and totally satiated my craving for Corn Dogs! If I can find better quality hot dogs around town, then I might make them again... As a little treat to myself... :]

And because corn dogs remind me of fairs and carnivals... Here's a picture of some carnie folk...
@Capital Ex, Edmonton '08
xx Caz
Happy Eating!!
Monday, 13 August 2012

Super Simple Quinoa Salad

Hallo lovelies!

The weather has been hot and sunny around these parts of late (well, by Edinburgh/UK standards at least!) and we had Miss Sok to visit at the weekend, so we haven't been eating the most balanced diet!
In a quest to eat something light which would up my vege intake, I threw together this super simple salad as part of dinner tonight and wanted to share it with you all!

I'd already made the quinoa as part of another dinner earlier in the week so just had the leftover sitting in the fridge.. so without further ado...

Ingredients:
1cup uncooked quinoa - it puffs up a LOT when you cook it, so don't be fooled by the teeny amount one cup seems to be when it's dry. Should yield about 2 cups when it's cooked, tho I didn't really measure.
1 red pepper (you could use orange as well)
1 yellow pepper
Juice of 1/4 lemon
Salt
Pepper

Directions:
Give the quinoa a quick rinse in cold water.
Cook the quinoa according to instructions on the package.. Mine recommended 1c quinoa to 2c water, bring to the boil, simmer for 15mins, then fluff with a fork. Throw the quinoa in the fridge to cool.
Dice the two peppers.
Throw the peppers in with the quinoa.
Squeeze 1/4 lemon juice over everything.
Mix everything up by tossing lightly.
Add salt and pepper to taste.
Et voila!

I served mine up with panfried mushrooms & onion along with oven cooked chicken. It was super tasty and light and the quinoa is very very filling!

Earlier in the week I served the quinoa hot with pan fried salmon & spinach. I've also thrown it into soup before to thicken it up a little and make it just that bit more filling. Beware that it does soak up LOADS of liquid so only add a little bit at a time and only if your soup has lots of liquid!

Quinoa is super versatile and also super duper healthy! There's all sorts of info on the interwebs, so I'll let you do your own research and make up your own mind.

But aside from the health benefits, it's a nice alternative to rice and it's super yummy nom noms!! So if you haven't tried it before, give it a go!!
xx Caz
If you have other tasty quinoa recipes, please leave 'em below..

Happy Monday!!

Sunday, 6 November 2011

Home-made Sweet & Sour Pork

I made this recipe months ago, before I went to Canada even, I had intended on posting the recipe while I was on holiday and I think I even promised it to a few people on facebook.. then I realised I never uploaded the photos, then it took me a while to find them... so here I am.. months after the fact... posting this recipe!

What you'll need:

  • 200ml Pineapple Juice
  • 1/4c cider vinegar (I would probably dial this back to 1/8c)
  • 2T soy
  • 2T honey
  • 2T sugar
  • 1/2t paprika
  • 1/2t five spice
  • 1/2t chilli
---------------------
  • green pepper, sliced or diced 
  • onion, sliced
  • 2c pineapple chunks (approx. I think I used most of a 500ml can)
  • 4 pork loin steaks, diced
-------------------------
  • 2T cornflour to thicken
  • 1c rice to serve


What to do:


Get your rice washed and started cooking if you are cooking rice from scratch.

Mix first group of ingredients in a bowl, have a wee taste to judge acidity & flavour. (I didn't do this.. I kinda threw in ingredients as I went, but this would have been a much better way to do it!) Feel free to adjust the flavour to suit your taste. Let me know any changes you make too!

Brown onion
Add peppers
Add pork, cook until pork has started to brown.

Add the sauce mix..

Once it's come to a boil, sieve in the cornflour to thicken up the sauce.. make sure you stir it in well so it doesn't get lumpy.  It would probably be easiest to scoop the solid ingredients to one side and tip the liquid to the other side and just add the cornflour to the liquid.. (does that make sense??)

Stir well, add more cornflour if you want your sauce to be thicker, or you can let it reduce down a bit if this won't overcook the pork.

Throw in the pineapple chunks near the end, a few minutes before you're ready to serve, so they don't get too soggy.

Hopefully your rice is done cooking by this stage!! Spoon plenty of pork and sauce over your rice and enjoy!!

I love the fact that this sweet and sour isn't bright orange! I've never really understood why restaurant sweet n sour is always so fluorescent orange... Maybe they use orange juice instead of pineapple juice but even still... Anywhos.. this is my "healthy" home made sweet & sour! You could essentially use it with chicken I guess as well.
xx Caz
I would love to know if you try this and if you make any changes to the sauce...

Happy Eating!!


Friday, 29 July 2011

Homeopathic cold remedy - Lemon, Honey & Ginger

So, Mr JGP is sick right now.... so I have resorted to my tried and true cold cure to try and help rid him of his sick bugs... and there's a few other people out there in blogLand who seem to be suffering from sick germs so I thought I would share my remedy...

It's super simple and I totally swear by it...
You need:
Lemon
Ginger - preferably fresh.. but the mushed stuff out of a jar would work too
Honey - preferably Manuka, it can be pricey, but I think it's worth it if you get the "active" stuff.. the higher the UMF rating, the better.. tho, also the more pricey it becomes!  if manuka is outta the price range.. just whatever honey you have in the cupboard will do too... tho I've only ever used clear runny honey.. but I don't see why the solid stuff wouldn't work...

To make one mug of yumminess:
Peel the skin off a bit of ginger and cut three slices (prob like 3-4mm thick), I then cut these slices into strips, so you have like mini ginger chips if you will.... put these into the bottom of your mug...
Cut two slices of lemon about 1/2cm thick (each).. go ahead and just throw the slices on top of the ginger...
Then get a spoon and load it up with honey... probably a flat tablespoon or a heaped teaspoon.. stick it in the mug and use the spoon to moosh your lemon slices and smoosh up the ginger...
Add hot boiling water, give it a stir and voila!!

It tastes wayyyy better than lemsip (in my opinion).. the honey soothes the throat and the lemon and ginger fight the sick germs!!

Lately I have been thinking that you could probably make this and put it in the fridge and drink it cold too...

It's caffeine free and it's super cheap (unless you splurge on the Manuka honey) and I totally swear that it makes me better when I'm sick... I've also gotten the mister on the wagon and JGP seems to be doing well on it too... :)
xx Caz
Next time you feel a tickle in your throat or just want a little boost... give this a go!!  Leme know how you get on!!

ps. if you are a super ginger fan.. you can also grate the ginger to really get the juices of out it.. (I usually grate the ginger over the mug to catch all the juice if I do it) but it can be a bit intense if you're not used to the heat...

Wednesday, 22 June 2011

Mug Brownie


The first time I had this was when I was visiting Ms S in Melbourne (many YEARS ago).. we were doing our usual lounging around after dinner and she asked if I wanted Mug Brownie.. I was like.. what the EFF is MUG BROWNIE??  She looked at me like I was mental coz I didn't know what she was talking about.. (maybe also because the name is rather indicative of what it is..) She proceeded to whip up two of these amazing little concoctions and I was smitten...

I remember asking her for the recipe (not so many but still years ago).. I'm pretty sure I wowed some dinner guests with it.. then kinda proceeded to forget about its existence until the other day when another Ms S mentioned she'd "baked" a cake in her microwave... her mister attested to its tastiness and she is a keen baker (using an oven) and cook, so I don't doubt its yumminess.. but it DID remind me of the mug brownie... I did a quick search of my emails to see if I had Ms S's recipe.. but alas.. no luck.. then I thought, surely the tinternet would supply me with one!! I was not disappointed!!

This is the recipe which is on most websites:

    2 T Vegetable oil 
    2T Water 
    1/4 tsp. Vanilla extract 
    dash salt 
    2T Unsweetened cocoa powder 
    4T Granulated sugar 
    4T Flour

      I also found this recipe and adapted my brownies according to people's comments and tweaked it a bit..

      Caz's Mug Brownies:

      1T Vegetable oil - I would have used applesauce but I didn't have any..
      3T Water
      1/4 t Vanilla extract
      dash salt
      2T cocoa powder
      2T Granulated sugar
      2T flour

      The websites say combine wet ingredients, then add cocoa powder, then sugar, then flour, but I just dumped everything in the mug and gave it all a good mix with a fork...

      We had some mini marshmallows which the mister brought home from somewhere.. apparently the girlfriend or one of his co-workers works at a coffee shop and they were getting rid of them? *shrug* - anyways, I threw a few on top for good measure...

      We have a 800W microwave and I zapped mine for 60 secs. and they were pretty good.. still a teeeny bit wet at the bottom, so maybe a bit longer woulda been ok.. depends how you like your brownie I guess!!


      xx Caz

      Sunday, 12 June 2011

      Fresh Mint & Chocolate Chip Cookies~

      I've baked these cookies a couple of times before.. and have been meaning to post the recipe.. I baked these cookies again tonight whilst waiting for the Formula 1 to restart... so thought I'd finally share the recipe with you all..
      I love that they use fresh mint.. 
      They also aren't overly sweet.. but still ridiculously moreish! 
      So you can eat loads and not feel icky.. WIN!!
       The original source of this recipe comes from eatpress and can be found by clicking the linky.. 
      What you need: (for 12 -15 cookies)
      1/2 c butter, room temperature
      1/2 c firmly packed brown sugar
      1/3 c caster sugar
      1 egg, beaten
      1 tsp pure vanilla extract
      1 1/2 c all-purpose flour
      1/2 tsp salt
      1/4 tsp baking soda
      1 c milk chocolate chips (or any kind you prefer)
      1/4 c coarsely chopped fresh mint leaves - I probably use about half a cup coz I like it minty!

      What to do:
      Preheat the oven to 180ºC (375ºF). 
      Cream the butter and sugars. 
      Add egg and vanilla slowly. 
      Sift together flour, salt and baking soda and then add to the egg mix and beat until just combined. Pop in the chocolate chips and chopped mint and mix together.
      Form the dough into 5cm (2 inch) balls. 
      Place on prepared baking sheet and bake until golden, about 9 minutes for chewy and 12 for crunchy. 
      Cool on rack. Store in airtight container. (If you don't eat them all!)  
      Delicious hot out of the oven or cold..
      Serve with a glass of milk!
      Happy Nomming!!
      xx Caz

      Tuesday, 17 May 2011

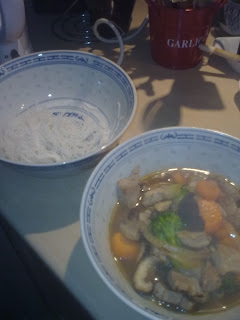
      Pork Noodle Soup

      This is a dish well cemented in our weekly rotation.. it's super quick and an absolute doddle.. also helps that it makes enough for lunch the next day and that always gets a thumbs up in my books!

      What you'll need:
      Some pork - we usually use loin steaks - chicken breast would work too...
      Some veges - today's edition includes an onion, shiitake mushrooms, broccoli & carrots.. (other days, it comes as bags of precut n packaged stir fry veges from the supermarket which usually include the above as well as bean sprouts and some chopped pak choi and sometimes mini corn) but the world is seriously your oyster when it comes to veg.. put in what you like.. and leave out what you don't! Simples!
      Some soy sauce - I use light
      Some sesame oil - normal oil works just as well, I just like the extra yummy smell of sesame oil..
      Some stock - in the form or liquid or enough cubes to make about 1L - I prefer vege but if you have chicken that's ok too... (can you get pork stock?? I've never seen it..)
      Some noodles - tonight's edition uses leftover rice noodles which came in a bag from the supermarket.. other nights it is egg noodles, either fresh from the supermarket or in dried form from the Asian supermarket..
      Salt, Pepper, Chilli powder (if you like it hot!)

      What to do:
      Dice the pork - or if you have a strange aversion to touching raw meat, then get the mister to do it for you..

       Chop your veges - seriously, if you do this step first, it'll save you hassle later...

       Heat some (sesame) oil in a wok

      Throw in your onions

      Once your onions have gone a bit translucent, throw in your pork - give it all a good stir! If you can make some pork or onion jump out of the wok, that's ok too... throw in some salt and pepper at this stage as well... 

      Once your pork's a bit brown - you don't want to over cook it, coz it's going to keep cooking as you go..
      Throw in your veges... no preferential treatment, just dump it all in there.. and give it a good stir

      You can either make up the stock from stock cubes, or just throw the stock cubes in and add water - I use boiling water from the jug/kettle - so things aren't cooking for too long in the wok

      Once the water's come to the boil.. give the soup a wee taste & add soy sauce as appropriate to your own taste.. I don't put in too much because I like the freshness and lightness of just the vege stock and the veges and pork will already add flavour to your soup... now is also the time to add some chilli powder if you're that way inclined...

      Grab your noodles...

      Throw your noodles in a big bowl, before the mister got his own "azn soup bowl" he used to eat his out of a fruit bowl/serving dish... then just ladle in your pork/vege/soupy goodness and away you go!!

      I love that this soup is meaty and has oomph enough for dinner but doesn't sit heavy in your stomach.. you're not using a lot of oil so it's not greasy either.. and you can seriously be sitting down to dinner in less than 30mins from start to finish! (Especially if you're using preprepared veg from the supermarket!)

      And best thing is?? You only have to use one wok!! (Ok, and maybe another pot if you're cooking noodles from dried..) Clean up is super easy anyways!  If you don't want to do noodles, you can skip that part and just have the soup as well...
      xx Caz
      Happy Eating!!

      Sunday, 15 May 2011

      Apple & Honey Marinaded Chicken

      This is yet another recipe which has been in my repertoire since some stage at uni... I'm pretty sure I came up with the idea because I had nothing else to cook my chicken in...and I always had apples lying around.. so hence, a signature dish was born!!

      What you need:
      Chicken - I prefer drumsticks but whatever you have/prefer is ok too..
      Apples - whatever you have lying around will do... (a good way to use up apples that are bit past their best by)
      Brown sugar
      Water
      Cinnamon
      Honey 
      Salt & Pepper
      Touch of oil

      What to do:
      Make like you're making applesauce, but leave it chunky... and dial back the brown sugar as you'll be adding honey to the chicken...

      Lay your drumsticks in an oven proof dish... bit of salt n pepper n drizzle a bit of oil on them...
      Throw some honey on there as well.. (I had some leftover applesauce I needed to use up, so I threw that on there too)
      Spoon the chunky apples over top of the chicken... (let the apples cool if you plan to marinade overnight, use the apples hot if you are cooking straight away)

      If you have time, then cover all this with foil and put in the fridge overnight to marinade... give the drumsticks a turn at the halfway point if you want....
      If you don't have time.. just cover with foil and throw it in the oven!
      I usually go with 180C for about 30-45mins... but check on it, and if you cut a slit and the juices run clear... you're ready to go!

      I served mine over some rice and blanched broccoli and carrots (chunky apples and all!).. - gotta eat your veges to avoid scurvy!!

      If you are a bit adverse to chunky apples on your chicken, you can always blend the applesauce and make it smooth.. Or if you don't have any apples around.. store bought apple sauce works too... but homemade's always so much better isn't it!?!?!

      If you haven't thought to put apples on your chicken... give it a twirl!! You might just like it!!

      I've made this for lots of people and it's always a success.. it's so easy and one of my signature dishes.. my Canadian wifey still asks for this dish from our days together in Whistler!! ; )

      Happy Eating!! 

      xx CazHope you've all had a great weekend!!

      Tuesday, 10 May 2011

      Ikea Meatball Spag with Easy-Peasy Pasta Sauce

      I have just now caught up on my blog reading! After two leisurely long weekends and some busy days at work, my google reader was showing a bold (87) unread posts.. eep! I had dipped into some blog reading along the way but hadn't found made time to really make a go of it...  what does this mean?? Hopefully.. more blog posts from yours truly! I've been reading a few "I'm a slack blogger" posts of late, and I've been having a think about that because I've been feeling a bit "guilty" about the radio silence but more about that in another post... 


      What I wanted to share with you is a super quick and easy weeknight dinner! A few weeks ago, we made a trek to Ikea.. I can't remember what our original purpose was for going.. but really, who really needs a proper reason to go to Ikea??!! At the check out were bags of the (in)famous Ikea meatballs, and being a complete sucker for marketing.. I couldn't help but pick up a bag and drop it casually in our trolley.. I might have also thrown in a bag of Daim bars pieces... I digress...

      I was excited to have meatball spag for dinner... So was the mister apparently.. 

      me: How many meatballs should I cook?
      mister: I dunno... how many are in the bag?
      me: *checks bag* I dunno.. it says it serves 8 tho...do you think maybe I should use half? 
      mister: Just cook them all...
      me: ALL of them? hmmm I guess we'll have leftover for lunch then... (yea and about a week after!) - don't make my mistake unless you've got people coming for dinner!

      So I've got an entire saucepan of meatballs cookin... I got a pot of water boiling for the spag... I open the cupboard... reach for the jar... check the label... HANG ON A SECOND!! Masala?? hmmm... that's not going to work...  maybe the pasta sauce is at the back of the cupboard?? *calls the mister to come and reach things* and after closer inspection.. nope... no pasta sauce... crap! *mini panic* I quickly googled "pasta sauce recipes" on ye olde interwebs... and decided.. it really wasn't all that hard!! Here's how I did it:

      Easy-Peasy Pasta Sauce

      What you'll need:
      1 can tomatoes 
      1 onion
      salt, pepper, basil, parsley (I only had the dry kind in the bottles but worked for me!)
      oil - olive, sunflower, whatever you normally cook with is fine.. I'm not going to pull a Rachel Ray and insist EVOO at every turn...

      What to do:
      Slice onions
      Heat oil and brown onions
      Throw in the entire can of tomatoes, sauce and all... 
      Let it cook a bit 
      Mash up the tomatoes with your chosen stirring device (mine happened to be a wooden spoon)
      Add salt, pepper, basil, parsley (whatever spices take your fancy really, the world is your oyster)

      I then took mine off the heat and gave it a whizzy with my hand blender coz I wanted smooth rather than chunky sauce.. 

      Et voila! Sauce!!

      Meatball Spag

      Heat desired amount of Ikea meatballs (yours don't have to be from Ikea, any meatballs will do.. homemade would be even better!) in a pan... 
      I just browned mine in oil... 
      Boil desired amount of pasta until al dente
      Throw the meatballs on the pasta
      Scoop on pasta sauce

      Dinner is served!!

      Easy-Peasy Japanesey as we used to say in school. Probably not very PC nowadays..  :)
      If I had mushrooms I probably woulda used those.. and we had brocolli as part of dinner too..
      xx CazThe photos are the portion I had at work for lunch the next day.. hence no veg.. coz we ate them all at dinnertime.. :)

      Thursday, 28 April 2011

      CornBread!!

      So, I know I promised this recipe FOR-EVAH ago... but we've had been inundated with long weekends galore here in the UK, which means a) I'm completely behind on my blog reading - I tend to read them at work in my downtime... which in turn leads to b) I haven't had much motivation to post and c) I've been out and about doing stuff, enjoying the sunshine & generally not stuck in front of a computer screen!!

      So all that aside... here is the long awaited cornbread recipe...
      Thanks to Ms Kos for posting it on her blog so I could indulge in the yumminess and share it with you all here too!!  Has anyone made them delectable ribs yet?? (I know Ms Kos made them yesterday!) How did they turn out?? Were they delicious or were they DEEEE-licious??!!! Or did you sit there thinking.. this Caz girl.. she needs her tastebuds checked!! These are blimmin AWWW-FUL!?!  (I highly doubt it, but there's no accounting for taste you know!)


      Without further ado!

      Yummy & delicious with pieces of corn all throughout... mmmmmmm!!

      Cornbread - via Ms Kos from Donna Dooher

      What you will need:

      • 1 cup corn kernels  - as in cut them off the corn, or a can from the Green Giant...  when I first read it, my immediate thought was... popcorn kernels!?!?! huh!?!?! ummm.. yea... NOT the sharpest tool in the shed at times....
      • 1 cup cornmeal  - cornMEAL... not cornFLOUR... do NOT make my idiotic mistake!! - read above about sharpest took in the shed...
      • 1 cup flour  - I used wholemeal the first time and white the second.. I quite like how the wholemeal tasted..
      • 1/3 cup sugar
      • 2 1/2 tsp baking powder
      • 1/2 tsp fine salt - I used sea salt coz that's all I got and it turned out just fine!
      • 1 cup buttermilk - first time I used natural yoghurt (as opposed to greek, for those smarty pants that will go, what kinda yoghurt isn't natural?? hardee harr harrrr, yea, don't give up the day job!)
      • 1/2 cup unsalted butter, melted
      • 1 egg
      • 2 tbsp jalapeno, finely chopped - I don't usually have chillies on hand... so I just threw in some chilli powder... second time I forgot entirely.. oops... still tasted good tho!!

      What to do:
      • Preheat the oven to 400 (200). Place the corn on a baking sheet and roast for 10 minutes. Cool completely, about 20 minutes.
      • Combine the cornmeal, flour, baking powder, sugar and salt in a large bowl. In a separate bowl beat together the buttermilk, butter and egg. Combine the jalapeno and corn with the dry ingredients until evenly distributed. Fold in the buttermilk mixture until just combined. 
      • Pour the batter into a pan and bake for 30 minutes, or until a knife inserted comes out clean. - Original Donna recipe calls for a skillet... I don't have a skillet... so I just dumped it into my silicone round cake pan and into the oven it went!! If I had a loaf time I probably woulda used that.. but I don't have one of them yet so... my cornbread came out round... it all looks the same in your tum!!  (Or if you're really crass - ie. my uncle.. "it all looks the same coming out!!")
      This was round 2..
      xx CazHappy Eating!!

      Sunday, 17 April 2011

      Tangy Balsamic Ribs

      Remember a couple of weeks ago, when I told you to make the Spicy Dr Pepper Pulled Pork??

      Well throw that sucker on the backburner.. coz these ribs totally take precedence... like TOTALLY.... they are SO delicious in fact.. that I have made them TWICE in four days... I made them Thursday night, took them to work for lunch on Friday, drawing just about everyone to the kitchen to investigate what I was eating.. then we ate them with cornbread for lunch on Saturday, and I bought ingredients to make it again when we were at the grocery store yesterday... yes.. they are THAT good...

      Awesome thing???

      They are SUPER easy!!! They will also make your house smell divine!

      Tangy Balsamic Ribs adapted from Slow Cooker Balsamic Beef Ribs @ Tasty Kitchen


      What you'll need:
      1/2 cup of applesauce - homemade is best!
      1/3 cup of balsamic vinegar
      2/3 cup of reggae reggae sauce - or your fave bbq sauce...
      750g ribs.. (we used pork)

      What to do:
      Put ribs in slow cooker...

      Take 1/2c of applesauce...

      Put it right on them ribs...

      Measure out 1/3c of balsamic...

      Measure out 2/3c of Reggae Reggae sauce...

       Here's the culprits...

      (If you want you could mix all the sauces together then pour them on the ribs but that just creates extra things to wash up!)

      Make sure the ribs are covered...

      Throw on some pepper... 

      Throw the top on your slow cooker... put it on LOW... let it do its thing for 4-5 hours.... [refer to edit below re: cooking times]

      BEHOLD THE NOMMIEST RIBS EVER!!!!

      MAKE THESE!!! TODAY!! TONIGHT!! RIGHT NOW!! 

      FOR THE LOVE OF ALL THINGS YUMMY!!

      YOUR TUMMY WITH BE ETERNALLY GRATEFUL!!!

      I'll stop yelling now... but seriously... please make these!!

      And serve em up with a side of cornbread....

      xx Caz

      Recipe for that will come tomorrow...
      [edit @ 13:20 18th April: having just had these at work for my lunch... I would say, if you are using big ribs like I did this time... let them cook for much longer than 5 hours... I would say, just keep cooking em until they are fall off the bone tender.... I also used a cheaper balsamic this time and you can def taste the difference.. there is not as much depth of flavour and it didn't caramelise as much as the more expensive balsamic I used last time.. I also put pepper straight on the ribs before adding the sauce.. but can't really see that making too much of a difference...??

      Upon further reflection, when I made these last time, not only did I use racks of ribs and cut them up individually, I cooked them for about 6 hours overnight, but I cooked them on low for another hour the next day to heat them up, then left it on warm.. this was the fateful Friday night we also fell asleep.. and missed dinner, so for fear of making us sick using the slow cooker to reheat on Saturday, I threw them in the oven on about 180 for half an hour - this may have been key to the further caramelisation... so if you have the paitience I would def throw them in the oven (uncovered) for half an hour just to cook off some liquid and to make them super fantastic

      I also meant to photo the cornbread but I forgot.. I have a piece left at home which I will photo & post with the recipe.. I was going to post it while I was at work, as we are going to dinner at a friend's tonight.. so recipe may come tomorrow instead..]